Arduinoでデータロガーを作る【温度センサ+SDカード+RTC】 [Arduino]
これまでで、
#Arduinoでデータロガーを作る【温度センサ+SDカード】
#ArduinoでRTCを使う
ができたので、これらを一つにまとめてタイムスタンプとセットでデータを保存できるようにしたいと思います。
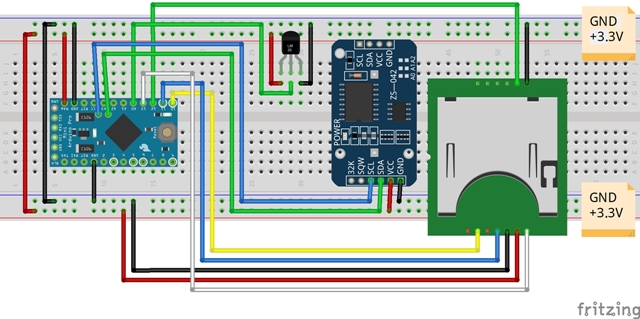
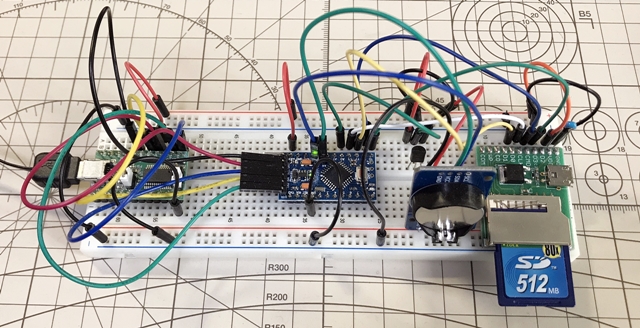
【配線図】
Fritzingの配線図では省略してしまったのですが、RTCのVCCとGNDには0.1μFのパスコンが接続してあります。ブレッドボードやジャンプワイヤのせいもあるかもしれませんが、動作が不安定だったのでパスコンはあった方がいいと思います。
あと、SDカード配線引出基板と電源とGNDの間のパスコンも。#ArduinoでSDカード情報を取得する


【スケッチ】
これで、タイムスタンプと温度データを一緒にSDカードのファイルに保存することができました。

#Arduinoでデータロガーを作る【温度センサ+SDカード】
#ArduinoでRTCを使う
ができたので、これらを一つにまとめてタイムスタンプとセットでデータを保存できるようにしたいと思います。
【配線図】
Fritzingの配線図では省略してしまったのですが、RTCのVCCとGNDには0.1μFのパスコンが接続してあります。ブレッドボードやジャンプワイヤのせいもあるかもしれませんが、動作が不安定だったのでパスコンはあった方がいいと思います。
あと、SDカード配線引出基板と電源とGNDの間のパスコンも。#ArduinoでSDカード情報を取得する
【スケッチ】
/******************************************************************************* SDカードデータロガー ++++++ note ++++++ ・測定した温度をコンソール画面に表示およびSDカードにデータ保存するプログラム ・Arduino Pro Mini(3.3V, 8MHz) ・温度センサ LM61BIZ(測定範囲:-25℃~+85℃) ・(※)RTCから取得した現在の日時データをSDカードファイル書き込みとコンソール画面表示に使う *******************************************************************************/ #include#include #include "RTClib.h" //RTCライブラリを導入 File myFile; //Fileオブジェクトの生成(インスタンス名:myFile) RTC_DS3231 rtc; //RTCオブジェクトの生成(インスタンス名:rtc) const float Vcc = 3.3; //電源電圧(定数) float temp_volt; //出力電圧 float temp_data; //温度 char daysOfTheWeek[7][6] = {"Sun.", "Mon.", "Tue.", "Wed.", "Thu.", "Fri.", "Sat."}; String youbi; //曜日を代入する int year, month, day, hour, minute, second; // the setup routine runs once when you press reset:初期化(電源投入/リセット時1回のみ実行) void setup() { // Open serial communications and wait for port to open: Serial.begin(9600); //9600bpsでシリアルポートを開く while (!Serial) { ; // wait for serial port to connect. Needed for native USB port only } //RTCオブジェクトの初期化 if (! rtc.begin()) { //RTCオブジェクトに初期化に失敗 Serial.println("Couldn't find RTC"); Serial.flush(); abort(); } //RTCオブジェクトに初期化に成功 // rtc.adjust(DateTime(F(__DATE__), F(__TIME__))); //今の(PCの)時刻に合わせる // →合わせ終わったらコメントアウトすること //SDカードの初期設定 Serial.print("Initializing SD card..."); if (!SD.begin(10)) { //4→10に変更 SDカードの初期化に失敗 Serial.println("initialization failed!"); while (1); } //SDカードの初期化に成功 Serial.println("initialization done."); } // the loop routine runs over and over again forever: main loop void loop() { int sensorValue = analogRead(A0); //read the input on analog pin 0: temp_volt = Vcc * sensorValue / 1023; //アナログピンから読み取った値を元の出力電圧値に戻す // 出力電圧から温度データを作成 temp_data = (temp_volt - 0.6) / 0.01; //【データシート】T[℃] = (Vo - 0.6) / 0.01 // RTCから現在の日時を取得(※) DateTime now = rtc.now(); year = now.year(); month = now.month(); day = now.day(); youbi = daysOfTheWeek[now.dayOfTheWeek()]; hour = now.hour(); minute = now.minute(); second = now.second(); // RTCの日時と温度データをコンソール画面に表示(※) // ①float(浮動小数点)形式で表示 Serial.print(year); //RTCの日時を表示 Serial.print('/'); Serial.print(month); Serial.print('/'); Serial.print(day); Serial.print('('); Serial.print(youbi); Serial.print(')'); Serial.print(hour); Serial.print(':'); Serial.print(minute); Serial.print(':'); Serial.print(second); Serial.print(" "); //tab(空欄)はダブルクォーテーションで囲む Serial.print(temp_data); //温度を表示 Serial.println("[℃]"); //単位は℃ // SDカードに書き込む // open the file. note that only one file can be open at a time, // so you have to close this one before opening another. myFile = SD.open("tempdata.txt", FILE_WRITE); //"tempdata.txt"ファイルを書き込み用に開く //戻り値がファイル情報になり、myFile に受け渡す // ファイルに温度データを書き込み(※) // if the file opened okay, write to it: if (myFile) { // ①float(浮動小数点)形式で書き込み myFile.print(year); myFile.print('/'); myFile.print(month); myFile.print('/'); myFile.print(day); myFile.print('('); myFile.print(youbi); myFile.print(')' ); myFile.print(hour); myFile.print(':'); myFile.print(minute); myFile.print(':'); myFile.print(second); myFile.print(" "); //tab(空欄)はダブルクォーテーションで囲む myFile.print(temp_data); myFile.println("[℃]"); // close the file: myFile.close(); //ファイルを閉じる //myFile.close() Fileオブジェクト(インスタンス)に対する関数 } else { // if the file didn't open, print an error: Serial.println("error opening tempdata.txt"); } delay(1000); //1秒単位 ※delay():単位ms }
これで、タイムスタンプと温度データを一緒にSDカードのファイルに保存することができました。
ArduinoでRTCを使う [Arduino]
前回に、#Arduinoでデータロガーを作る【温度センサ+SDカード】
>なので、次はRTCを使ってタイムスタンプとセットでデータを保存できるようにしたいと思います。
と書いたので、RTCを試してみたいと思います。
Amazonは電子部品のレパートリーも豊富で入手性も良く、送料無料の物も多いので、重宝しています。
DS3231 AT24C32 時計モジュール リアル時間時計モジュール IICモジュール RTCモジュール に対応(3個セット)
"https://www.amazon.co.jp/AT24C32-%E3%83%AA%E3%82%A2%E3%83%AB%E6%99%82%E9%96%93%E6%99%82%E8%A8%88%E3%83%A2%E3%82%B8%E3%83%A5%E3%83%BC%E3%83%AB-IIC%E3%83%A2%E3%82%B8%E3%83%A5%E3%83%BC%E3%83%AB-RTC%E3%83%A2%E3%82%B8%E3%83%A5%E3%83%BC%E3%83%AB-Arduino%E3%81%AB%E5%AF%BE%E5%BF%9C/dp/B0793MNVR4/ref=pd_ybh_a_4?_encoding=UTF8&psc=1&refRID=D02CJTZ6E9CCYEBD410S"
★注意★
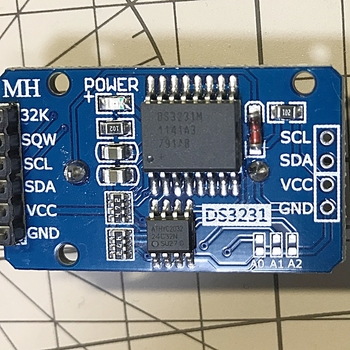
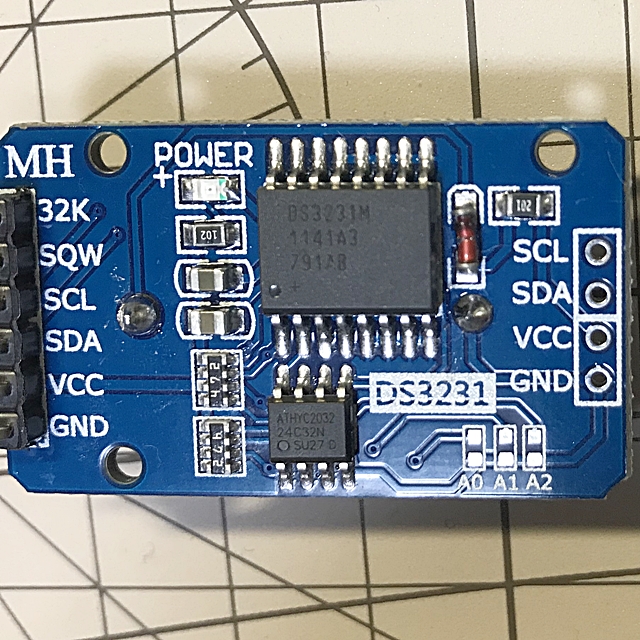
「DS3231」にはいくつかの種類があるようです。
今回購入したRTCモジュールに搭載されていたのは「DS3231M」でした。
「DS3231M」はTCXOではなくMEMS共振子で、周波数精度も±2ppm→±5ppmと残念ながらやや劣るようです。。。3個で890円だったからかなー。安いとチップが違うのかなー。
充電式リチウムイオンボタン電池 LIR2032 3.6V 40mAh 約500回 CR2032の代わり 5枚入1セット
"https://www.amazon.co.jp/%E5%85%85%E9%9B%BB%E5%BC%8F%E3%83%AA%E3%83%81%E3%82%A6%E3%83%A0%E3%82%A4%E3%82%AA%E3%83%B3%E3%83%9C%E3%82%BF%E3%83%B3%E9%9B%BB%E6%B1%A0-LIR2032-40mAh-CR2032%E3%81%AE%E4%BB%A3%E3%82%8F%E3%82%8A-5%E6%9E%9A%E5%85%A5%EF%BC%91%E3%82%BB%E3%83%83%E3%83%88/dp/B08FHWQBBK/ref=pd_ybh_a_2?_encoding=UTF8&psc=1&refRID=D02CJTZ6E9CCYEBD410S"
コイン電池充電器
"https://www.amazon.co.jp/Entatial-%E5%B0%8F%E5%9E%8B%E3%83%9C%E3%83%87%E3%82%A3%E4%BF%A1%E9%A0%BC%E6%80%A7%E3%81%AE%E9%AB%98%E3%81%84%E3%83%9C%E3%82%BF%E3%83%B3%E9%9B%BB%E6%B1%A0%E5%85%85%E9%9B%BB%E5%99%A8%E3%80%81%E5%85%85%E9%9B%BB%E5%99%A8%E3%80%81%E6%8C%81%E3%81%A1%E9%81%8B%E3%81%B3%E3%81%8C%E7%B0%A1%E5%8D%98%E9%9B%BB%E6%B1%A0%E5%85%85%E9%9B%BB%E7%94%A8%E3%81%AE%E5%AE%89%E5%AE%9A%E3%81%97%E3%81%9F%E6%80%A7%E8%83%BD%E3%82%B3%E3%82%A4%E3%83%B3%E9%9B%BB%E6%B1%A0%E5%85%85%E9%9B%BB%E5%99%A8-U-S-regulations/dp/B08NF7YTFM/ref=psdc_2285180051_t1_B08NDVRMH1"
LIR2032ボタン(コイン)電池の充電用に1個買ったのですが2個届きました。
でも、そのうちの1個は動作不良でした。。。
中華製は、時々想定外のことが起こりますねー(笑)
まずは単体で動作させてみたいと思います。
時刻データをコンソール画面に出力します。
ネットでググれば、この程度の情報はたくさんあるのでサクサクと進めたいと思います。
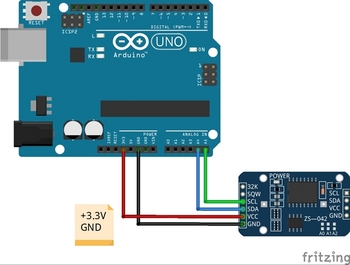
【配線図】
【スケッチ】
ネット情報により、ご多分に漏れず、ライブラリーをDLしてインクルードします。
DS3231で使用可能なライブラリは複数あるようですが、Arduino IDEのライブラリ管理でヒットした、
RTCLib (Adafruit)をそのまま使います。
コンパイルしてArduinoに書き込んだ後に、Arduino IDEのシリアルモニタを確認すると、
3秒に1回、時刻データが更新されていきます。
■時刻アジャストについて
手持ちの電波時計と比較すると、時刻データが1分ほど遅れていました。
これは、
rtc.adjust(DateTime(F(__DATE__), F(__TIME__)));
にて、今の(PCの)時刻に合わせるようにしているのですが、コンパイルにかかる時間分がずれてしまうためだそうです。
ネットでは、時刻合わせのための治具を作成して調整されている記事もありましたので、機会があったら挑戦してみたいと思います。
今回は、単体での動作を優先したく、そこまでの調整はしませんでしたが、コンパイルにかかる時間を短くすれば誤差は小さくなると思いますので、先ほどのスケッチから余計なプログラムを削除してなるべく軽くしたものを、時刻合わせ用のスケッチとして再作成しておきました。
>なので、次はRTCを使ってタイムスタンプとセットでデータを保存できるようにしたいと思います。
と書いたので、RTCを試してみたいと思います。
Amazonは電子部品のレパートリーも豊富で入手性も良く、送料無料の物も多いので、重宝しています。
DS3231 AT24C32 時計モジュール リアル時間時計モジュール IICモジュール RTCモジュール に対応(3個セット)
"https://www.amazon.co.jp/AT24C32-%E3%83%AA%E3%82%A2%E3%83%AB%E6%99%82%E9%96%93%E6%99%82%E8%A8%88%E3%83%A2%E3%82%B8%E3%83%A5%E3%83%BC%E3%83%AB-IIC%E3%83%A2%E3%82%B8%E3%83%A5%E3%83%BC%E3%83%AB-RTC%E3%83%A2%E3%82%B8%E3%83%A5%E3%83%BC%E3%83%AB-Arduino%E3%81%AB%E5%AF%BE%E5%BF%9C/dp/B0793MNVR4/ref=pd_ybh_a_4?_encoding=UTF8&psc=1&refRID=D02CJTZ6E9CCYEBD410S"
★注意★
「DS3231」にはいくつかの種類があるようです。
今回購入したRTCモジュールに搭載されていたのは「DS3231M」でした。
「DS3231M」はTCXOではなくMEMS共振子で、周波数精度も±2ppm→±5ppmと残念ながらやや劣るようです。。。3個で890円だったからかなー。安いとチップが違うのかなー。
充電式リチウムイオンボタン電池 LIR2032 3.6V 40mAh 約500回 CR2032の代わり 5枚入1セット
"https://www.amazon.co.jp/%E5%85%85%E9%9B%BB%E5%BC%8F%E3%83%AA%E3%83%81%E3%82%A6%E3%83%A0%E3%82%A4%E3%82%AA%E3%83%B3%E3%83%9C%E3%82%BF%E3%83%B3%E9%9B%BB%E6%B1%A0-LIR2032-40mAh-CR2032%E3%81%AE%E4%BB%A3%E3%82%8F%E3%82%8A-5%E6%9E%9A%E5%85%A5%EF%BC%91%E3%82%BB%E3%83%83%E3%83%88/dp/B08FHWQBBK/ref=pd_ybh_a_2?_encoding=UTF8&psc=1&refRID=D02CJTZ6E9CCYEBD410S"
コイン電池充電器
"https://www.amazon.co.jp/Entatial-%E5%B0%8F%E5%9E%8B%E3%83%9C%E3%83%87%E3%82%A3%E4%BF%A1%E9%A0%BC%E6%80%A7%E3%81%AE%E9%AB%98%E3%81%84%E3%83%9C%E3%82%BF%E3%83%B3%E9%9B%BB%E6%B1%A0%E5%85%85%E9%9B%BB%E5%99%A8%E3%80%81%E5%85%85%E9%9B%BB%E5%99%A8%E3%80%81%E6%8C%81%E3%81%A1%E9%81%8B%E3%81%B3%E3%81%8C%E7%B0%A1%E5%8D%98%E9%9B%BB%E6%B1%A0%E5%85%85%E9%9B%BB%E7%94%A8%E3%81%AE%E5%AE%89%E5%AE%9A%E3%81%97%E3%81%9F%E6%80%A7%E8%83%BD%E3%82%B3%E3%82%A4%E3%83%B3%E9%9B%BB%E6%B1%A0%E5%85%85%E9%9B%BB%E5%99%A8-U-S-regulations/dp/B08NF7YTFM/ref=psdc_2285180051_t1_B08NDVRMH1"
LIR2032ボタン(コイン)電池の充電用に1個買ったのですが2個届きました。
でも、そのうちの1個は動作不良でした。。。
中華製は、時々想定外のことが起こりますねー(笑)
まずは単体で動作させてみたいと思います。
時刻データをコンソール画面に出力します。
ネットでググれば、この程度の情報はたくさんあるのでサクサクと進めたいと思います。
【配線図】

【スケッチ】
ネット情報により、ご多分に漏れず、ライブラリーをDLしてインクルードします。
DS3231で使用可能なライブラリは複数あるようですが、Arduino IDEのライブラリ管理でヒットした、
RTCLib (Adafruit)をそのまま使います。
/*******************************************************************************
RTC(DS3231) サンプルプログラム

++++++ note ++++++

*******************************************************************************/
// Date and time functions using a DS3231 RTC connected via I2C and Wire lib
#include "RTClib.h"                                 //RTCライブラリを導入

RTC_DS3231 rtc;                                     //RTCオブジェクトの生成(インスタンス名:rtc)

char daysOfTheWeek[7][12] = {"Sunday", "Monday", "Tuesday", "Wednesday", "Thursday", "Friday", "Saturday"};

void setup () {
  Serial.begin(9600);                               //9600bpsでシリアルポートを開く

#ifndef ESP8266    //【条件コンパイル】 もしESP8266が定義されていなかったら
  while (!Serial); // wait for serial port to connect. Needed for native USB
                   //(シリアルポートが接続するのを待ちます。 ネイティブUSBに必要)
#endif
//RTCオブジェクトの初期化
  if (! rtc.begin()) {                              //RTCオブジェクトに初期化に失敗
    Serial.println("Couldn't find RTC");
    Serial.flush();
    abort();
  }                                                 //RTCオブジェクトに初期化に成功
  rtc.adjust(DateTime(F(__DATE__), F(__TIME__)));   //今の(PCの)時刻に合わせる
                                                    //合わせ終わったらコメントアウトする
  if (rtc.lostPower()) {
    Serial.println("RTC lost power, let's set the time!");
    // When time needs to be set on a new device, or after a power loss, the
    // following line sets the RTC to the date & time this sketch was compiled
    rtc.adjust(DateTime(F(__DATE__), F(__TIME__)));
    // This line sets the RTC with an explicit date & time, for example to set
    // January 21, 2014 at 3am you would call:
    // rtc.adjust(DateTime(2014, 1, 21, 3, 0, 0));
  }

  // When time needs to be re-set on a previously configured device, the
  // following line sets the RTC to the date & time this sketch was compiled
  // rtc.adjust(DateTime(F(__DATE__), F(__TIME__)));
  // This line sets the RTC with an explicit date & time, for example to set
  // January 21, 2014 at 3am you would call:
  // rtc.adjust(DateTime(2014, 1, 21, 3, 0, 0));
}

void loop () {
    DateTime now = rtc.now();

    Serial.print(now.year(), DEC);
    Serial.print('/');
    Serial.print(now.month(), DEC);
    Serial.print('/');
    Serial.print(now.day(), DEC);
    Serial.print(" (");
    Serial.print(daysOfTheWeek[now.dayOfTheWeek()]);
    Serial.print(") ");
    Serial.print(now.hour(), DEC);
    Serial.print(':');
    Serial.print(now.minute(), DEC);
    Serial.print(':');
    Serial.print(now.second(), DEC);
    Serial.println();

    Serial.print(" since midnight 1/1/1970 = ");
    Serial.print(now.unixtime());
    Serial.print("s = ");
    Serial.print(now.unixtime() / 86400L);
    Serial.println("d");

    // calculate a date which is 7 days, 12 hours, 30 minutes, 6 seconds into the future
    DateTime future (now + TimeSpan(7,12,30,6));

    Serial.print(" now + 7d + 12h + 30m + 6s: ");
    Serial.print(future.year(), DEC);
    Serial.print('/');
    Serial.print(future.month(), DEC);
    Serial.print('/');
    Serial.print(future.day(), DEC);
    Serial.print(' ');
    Serial.print(future.hour(), DEC);
    Serial.print(':');
    Serial.print(future.minute(), DEC);
    Serial.print(':');
    Serial.print(future.second(), DEC);
    Serial.println();

    Serial.print("Temperature: ");
    Serial.print(rtc.getTemperature());
    Serial.println(" C");

    Serial.println();
    delay(3000);
}
コンパイルしてArduinoに書き込んだ後に、Arduino IDEのシリアルモニタを確認すると、
3秒に1回、時刻データが更新されていきます。
■時刻アジャストについて
手持ちの電波時計と比較すると、時刻データが1分ほど遅れていました。
これは、
rtc.adjust(DateTime(F(__DATE__), F(__TIME__)));
にて、今の(PCの)時刻に合わせるようにしているのですが、コンパイルにかかる時間分がずれてしまうためだそうです。
ネットでは、時刻合わせのための治具を作成して調整されている記事もありましたので、機会があったら挑戦してみたいと思います。
今回は、単体での動作を優先したく、そこまでの調整はしませんでしたが、コンパイルにかかる時間を短くすれば誤差は小さくなると思いますので、先ほどのスケッチから余計なプログラムを削除してなるべく軽くしたものを、時刻合わせ用のスケッチとして再作成しておきました。


