ArduinoでSDカード情報を取得する [Arduino]
(2021.1.1更新)
#とりあえず、上手くいかなかったことも後学のためと思い、掲載します。
#後日、解決したらタイトルも変えて、更新したいと思います。
(2021.1.9更新) Papilioシリーズ、中止しました
”Papilioでカメラ画像を転送する”シリーズをやっていますが、まぁまぁそんなにスムーズにいくわけもなく、いい感じで行き詰っております orz。。。
なかなか実績もないところもあり、Papilio or ZPUinoのどちらで間違えているか?切り分けもままならぬ状況なので、一旦、Arduinoで試してみようと思います。
ArduinoからSDカードへファイルを読み書きさせたいのですが、まず最初はタイトル通りにArduinoからSDカードの情報を取得してみたいと思います。
SDカードのIOは3.3Vで、Arduino UNOは5Vなのでそのままでは使えません。そのため今回はArduino Pro Mini(3.3V, 8MHz)を使います。
ArduinoとSDカードのやり取りはSPIというインターフェースで行われます。
SPIとは、。。。。。。。
ANALOGDEVICES社の技術資料ページのリンクを貼っておきます。
"https://www.analog.com/jp/analog-dialogue/articles/introduction-to-spi-interface.html#"
SDカードソケットを調達します。これ↓です。
SDカード配線引出基板
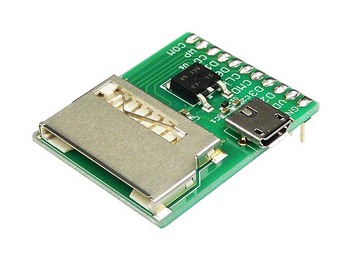
"https://akizukidenshi.com/catalog/g/gK-10967/"
DIP化されるのでブレッドボードで使用可能になります。
USBコネクタは電源供給用です(基板上で5V→3.3Vに変換)。
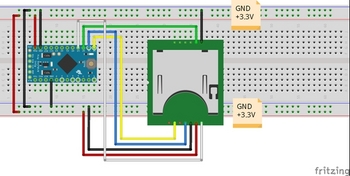
【配線図】
E38394E383B3E9858DE7BDAEE59BB3.jpg)
Arduino Pro Mini (pin) --- SDカード(基板)
SCK(13) CLK(CLK)
MISO(12) D0/DAT0(D0)
MOSI(11) DI/CMD(CMD)
SS(10) CS/CD/DAT3(D3)
【スケッチ】
最初にSDカード情報をコンソール画面に表示する、サンプルスケッチを試してみます。
Arduino IDEから
ファイル>スケッチ例>SD>CardInfo
スケッチのCS(SS)ピン番号を4→10に変更しています。
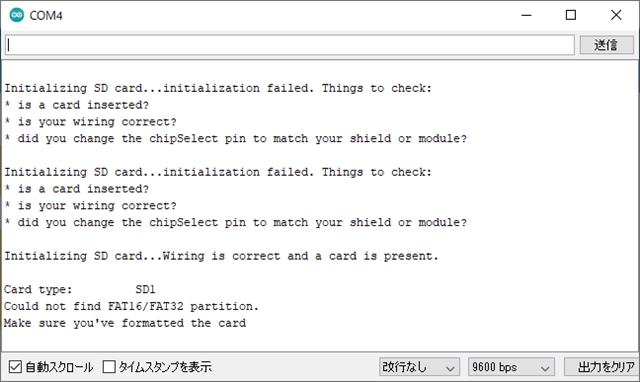
手元にあった512MBのSDカードを使って試してみましたが、動作がかなり不安定です。カード情報を取れたり、取れなかったり。
Arduino Pro Miniボードのリセットを何度か押して、コンソール画面に表示させます。
配線長とかも不安定の要素らしいので、出来るだけ短くした方が良いそうです。
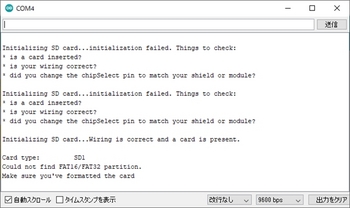
とりあえずSDカードと認識しても”パーティションが無い!”とか不完全な感じです。
”Windows標準のフォーマットではなくてSDフォーマッターを使用してフォーマットした方が良い”とのネット記事も読んだので試してみましたが、状況は変わらないです。。。(FAT16 or FAT32でフォーマットしているんですけどね)
SDアソシエーション
"https://www.sdcard.org/jp/index.html"
その後、Arduino Pro Miniボードのリセットを連打しても、
Initializing SD card...initialization failed. Things to check:
* is a card inserted?
* is your wiring correct?
* did you change the chipSelect pin to match your shield or module?
のメッセージしか出ないですね。”配線を見直せ”と言われても4本しかないですからねー。
感覚的には20回に1回くらいでSDカードを認識するメッセージも出ますが、やっぱり"パーティションが無い"と言われて。。。
いずれにせよ、ちょっとこのままでは使い物にならないわけで、次の手を考えてみたいと思います。
=========================================================
(2021.1.1更新)
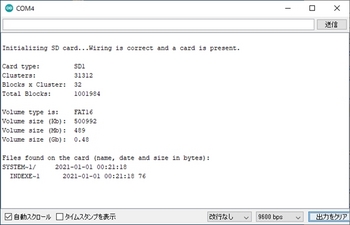
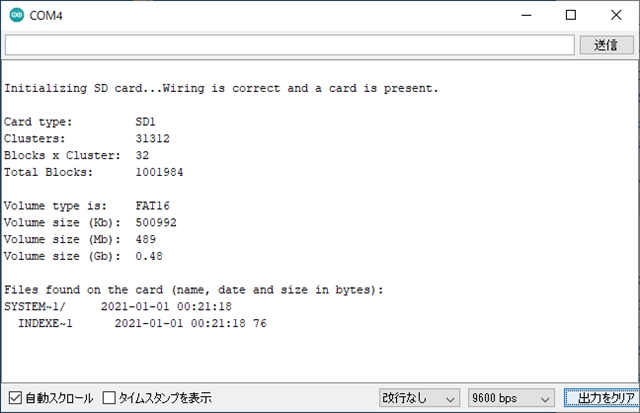
前回までの不安定動作が解消し、カード情報を取得することが出来たので更新します。
やったことは2つ、①電源強化と②パスコンの実装です。
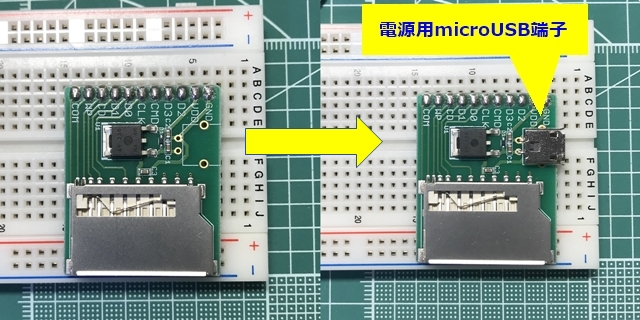
①はこれまでもSDカードにアクセスした際に電圧降下も観測しなかったので”ちょっと違うかもしれない”とは思いつつ、電源周りを見直すことも一つの案として実施しました。
SDカード配線引出基板にはmicroUSB端子を利用して外部から5V電源を入力することが可能です。これまではArduino Pro Miniと同系統で3.3Vを供給していたため、電源ラインを分ける形にしました。
ただ結果的に、想定通りに問題解決策にはなりませんでした。
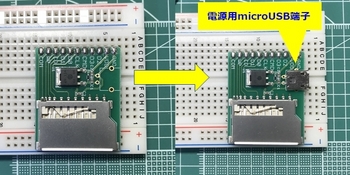
基板にmicroUSB端子を追加実装しています。
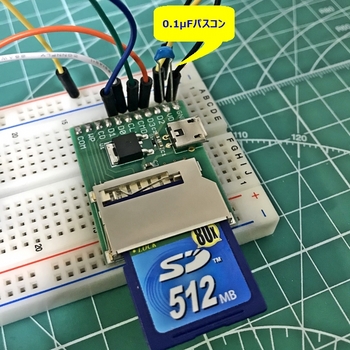
②パスコンの実装
電源とGNDの間に0.1μFのパスコンを実装しました(いわゆる、お守り代わりですが)。
実は前回もやって上手くいかなかったのですが、今回はブレッドボードに挿す感触が前回より強め?のような気がして。。。
結果、電源ラインもmicroUSB端子からこれまでと同様にArduino Pro Miniと同系統で3.3Vを供給しても安定動作して、パスコンが問題解決策になりました。
Arduino Pro Miniボードのリセットを押して、コンソール画面に表示させます。

(2021.1.9更新) Papilioシリーズ、中止しました
ArduinoからSDカードへファイルを読み書きさせたいのですが、まず最初はタイトル通りにArduinoからSDカードの情報を取得してみたいと思います。
SDカードのIOは3.3Vで、Arduino UNOは5Vなのでそのままでは使えません。そのため今回はArduino Pro Mini(3.3V, 8MHz)を使います。
ArduinoとSDカードのやり取りはSPIというインターフェースで行われます。
SPIとは、。。。。。。。
ANALOGDEVICES社の技術資料ページのリンクを貼っておきます。
"https://www.analog.com/jp/analog-dialogue/articles/introduction-to-spi-interface.html#"
SDカードソケットを調達します。これ↓です。
SDカード配線引出基板

"https://akizukidenshi.com/catalog/g/gK-10967/"
DIP化されるのでブレッドボードで使用可能になります。
USBコネクタは電源供給用です(基板上で5V→3.3Vに変換)。
【配線図】
E38394E383B3E9858DE7BDAEE59BB3.jpg)
Arduino Pro Mini (pin) --- SDカード(基板)
SCK(13) CLK(CLK)
MISO(12) D0/DAT0(D0)
MOSI(11) DI/CMD(CMD)
SS(10) CS/CD/DAT3(D3)

【スケッチ】
最初にSDカード情報をコンソール画面に表示する、サンプルスケッチを試してみます。
Arduino IDEから
ファイル>スケッチ例>SD>CardInfo
スケッチのCS(SS)ピン番号を4→10に変更しています。
/*
  SD card test

  This example shows how use the utility libraries on which the'
  SD library is based in order to get info about your SD card.
  Very useful for testing a card when you're not sure whether its working or not.

  The circuit:
    SD card attached to SPI bus as follows: >次のようにSPIバスに接続されたSDカード
 ** MOSI - pin 11 on Arduino Uno/Duemilanove/Diecimila >Arduino Uno / Duemilanove / Diecimilaのピン11
 ** MISO - pin 12 on Arduino Uno/Duemilanove/Diecimila
 ** CLK - pin 13 on Arduino Uno/Duemilanove/Diecimila
 ** CS - depends on your SD card shield or module. >SDカードのシールドまたはモジュールによって異なります。
 		Pin 4 used here for consistency with other Arduino examples
                >他のArduinoの例との一貫性のためにここで使用されるピン4


  created  28 Mar 2011
  by Limor Fried
  modified 9 Apr 2012
  by Tom Igoe
*/
/*******************************************************************************
テスト用SDカード情報取得プログラム
++++++ note ++++++
・Arduino Pro Mini用にSSピンを変更
・SDカード情報をコンソール画面に表示するプログラム

*******************************************************************************/
// include the SD library:
#include
#include

// set up variables using the SD utility library functions:
Sd2Card card;
SdVolume volume;
SdFile root;

// change this to match your SD shield or module;
// Arduino Ethernet shield: pin 4
// Adafruit SD shields and modules: pin 10
// Sparkfun SD shield: pin 8
// MKRZero SD: SDCARD_SS_PIN
//const int chipSelect = 4;
//↓変更
// Arduino Pro Mini: pin 10
const int chipSelect = 10;

void setup() {
  // Open serial communications and wait for port to open:
  Serial.begin(9600);
  while (!Serial) {
    ; // wait for serial port to connect. Needed for native USB port only
  }


  Serial.print("\nInitializing SD card...");

  // we'll use the initialization code from the utility libraries
  // since we're just testing if the card is working!
  if (!card.init(SPI_HALF_SPEED, chipSelect)) {
    Serial.println("initialization failed. Things to check:");
    Serial.println("* is a card inserted?");
    Serial.println("* is your wiring correct?");
    Serial.println("* did you change the chipSelect pin to match your shield or module?");
    while (1);
  } else {
    Serial.println("Wiring is correct and a card is present.");
  }

  // print the type of card
  Serial.println();
  Serial.print("Card type:         ");
  switch (card.type()) {
    case SD_CARD_TYPE_SD1:
      Serial.println("SD1");
      break;
    case SD_CARD_TYPE_SD2:
      Serial.println("SD2");
      break;
    case SD_CARD_TYPE_SDHC:
      Serial.println("SDHC");
      break;
    default:
      Serial.println("Unknown");
  }

  // Now we will try to open the 'volume'/'partition' - it should be FAT16 or FAT32
  if (!volume.init(card)) {
    Serial.println("Could not find FAT16/FAT32 partition.\nMake sure you've formatted the card");
    while (1);
  }

  Serial.print("Clusters:          ");
  Serial.println(volume.clusterCount());
  Serial.print("Blocks x Cluster:  ");
  Serial.println(volume.blocksPerCluster());

  Serial.print("Total Blocks:      ");
  Serial.println(volume.blocksPerCluster() * volume.clusterCount());
  Serial.println();

  // print the type and size of the first FAT-type volume
  uint32_t volumesize;
  Serial.print("Volume type is:    FAT");
  Serial.println(volume.fatType(), DEC);

  volumesize = volume.blocksPerCluster();    // clusters are collections of blocks
  volumesize *= volume.clusterCount();       // we'll have a lot of clusters
  volumesize /= 2;                           // SD card blocks are always 512 bytes (2 blocks are 1KB)
  Serial.print("Volume size (Kb):  ");
  Serial.println(volumesize);
  Serial.print("Volume size (Mb):  ");
  volumesize /= 1024;
  Serial.println(volumesize);
  Serial.print("Volume size (Gb):  ");
  Serial.println((float)volumesize / 1024.0);

  Serial.println("\nFiles found on the card (name, date and size in bytes): ");
  root.openRoot(volume);

  // list all files in the card with date and size
  root.ls(LS_R | LS_DATE | LS_SIZE);
}

void loop(void) {
}
手元にあった512MBのSDカードを使って試してみましたが、動作がかなり不安定です。カード情報を取れたり、取れなかったり。
Arduino Pro Miniボードのリセットを何度か押して、コンソール画面に表示させます。
配線長とかも不安定の要素らしいので、出来るだけ短くした方が良いそうです。
とりあえずSDカードと認識しても”パーティションが無い!”とか不完全な感じです。
”Windows標準のフォーマットではなくてSDフォーマッターを使用してフォーマットした方が良い”とのネット記事も読んだので試してみましたが、状況は変わらないです。。。(FAT16 or FAT32でフォーマットしているんですけどね)
SDアソシエーション
"https://www.sdcard.org/jp/index.html"
その後、Arduino Pro Miniボードのリセットを連打しても、
Initializing SD card...initialization failed. Things to check:
* is a card inserted?
* is your wiring correct?
* did you change the chipSelect pin to match your shield or module?
のメッセージしか出ないですね。”配線を見直せ”と言われても4本しかないですからねー。
感覚的には20回に1回くらいでSDカードを認識するメッセージも出ますが、やっぱり"パーティションが無い"と言われて。。。
いずれにせよ、ちょっとこのままでは使い物にならないわけで、次の手を考えてみたいと思います。
=========================================================
(2021.1.1更新)
前回までの不安定動作が解消し、カード情報を取得することが出来たので更新します。
やったことは2つ、①電源強化と②パスコンの実装です。
①はこれまでもSDカードにアクセスした際に電圧降下も観測しなかったので”ちょっと違うかもしれない”とは思いつつ、電源周りを見直すことも一つの案として実施しました。
SDカード配線引出基板にはmicroUSB端子を利用して外部から5V電源を入力することが可能です。これまではArduino Pro Miniと同系統で3.3Vを供給していたため、電源ラインを分ける形にしました。
ただ結果的に、想定通りに問題解決策にはなりませんでした。
基板にmicroUSB端子を追加実装しています。
②パスコンの実装
電源とGNDの間に0.1μFのパスコンを実装しました(いわゆる、お守り代わりですが)。
実は前回もやって上手くいかなかったのですが、今回はブレッドボードに挿す感触が前回より強め?のような気がして。。。
結果、電源ラインもmicroUSB端子からこれまでと同様にArduino Pro Miniと同系統で3.3Vを供給しても安定動作して、パスコンが問題解決策になりました。

Arduino Pro Miniボードのリセットを押して、コンソール画面に表示させます。
2020-12-26 22:58
nice!(0)
コメント(0)


コメント 0